Five tips for a pencil portrait
Originally published 12/26/15
___________________________________________________
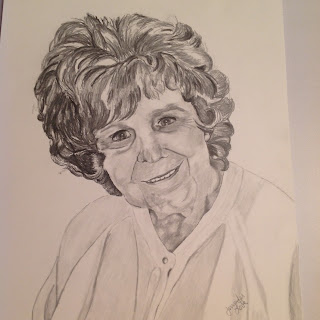
Since I have dedicated my attention to watercolor painting in the past several years, it has been a long while since I created a pencil portrait. Drawing skills, of course, are important to any painter - as you still have to transfer your design to the paper before painting. But, I haven't focused on pencil drawings as the final product for a long time. So, recently, when I was commissioned to do a pencil portrait for a Christmas gift, I thought I might break down the steps and tools that I prefer to use in the process and write a little blog post about it.
Tip #1: Use a grid. This is good for any drawing you are trying to recreate from a snapshot, but especially for portrait work. Make a copy of the picture you are using and draw a grid on the top. Then make a proportional grid (in light pencil marks) on the paper you are using in order to lay out the picture proportionally. This will be especially helpful for nose, eyes, mouth.
Tip #2: Draw upside down. When you work on faces upside down, it helps translate the components into shapes rather than "a face." This helps the idea of drawing people become less intimidating. Check the drawing right side up against your reference photo through the process to make sure things are still looking correct.
Tip #3: Use hard and soft pencils. The harder pencil will allow lighter lines and is good for line drawing and blocking in shadows. The softer pencil will help with medium and dark shadows. (Harder pencils have lower numbers. The higher the number, the softer the pencil). I like 2B for hard and 6B for soft.
Tip #4: Use blending stumps. These are great for softening and blending edges and shadows. They also help keep your fingers clean so you don't leave unexpected fingerprints on your paper as you work!
Tip #5: Take a picture of the "finished" portrait with your smartphone or tablet. Then give yourself a little time away (even 10-15 minutes will do). Come back to look at the photo of your portrait and compare it to your reference photo. This will help you see little details that might need to be fixed. Sometimes things will even jump out at you before you compare it to your reference pic. It's a good tool for making sure you get those finishing touches in and are happy with the final piece. Also...you must realize the final is never going to be perfect. It is not meant to be a photograph. But, hopefully, you will capture the intended spirit.
Here is the final portrait.

Now that this commission is done, I'll be getting back to my watercolors and posting some new paintings soon!
As always, thanks for stopping by my blog. :)


Looks just like her. Thanks for the 5 Tips. Yes, I need to get back to pencil work too. Painting is so fun. But oh how important to stop and sketch often. Thanks for the info. Hope you are well you busy Lady!
ReplyDelete